Sending email from robotmia
Introduction
robotmia allows you to tie data to a specific user, creating a profile. This is where you store things like their email address, where they came from, or their age. When you include an email address, you can start sending targeted emails right from robotmia. At this time, robotmia users on a free account are limited to 150,000 email messages per month. Read more about message limits.
Email targeting can be based on properties in user profiles, or events that did or did not occur within the last 90 days. For example, if you set a Signup date property,
you can create an email that only sends to users who signed up over two weeks ago.
Sending email addresses to robotmia
You can only send emails to users whose profiles have the special $email property. The value of this property should be
the email address of the user as a string - something like "joe.doe@example.com". To set this property with the JavaScript library,
you can make a call to robotmia.people.set:
robotmia.people.set({
    $email: "joe.doe@example.com"
});
Creating an email message
An email message consists of a from-name and address, a subject, and a message body. To create a new email message, navigate to the Messages report and select "Email Message" from the "Create new message" dropdown. This will give you the following form:
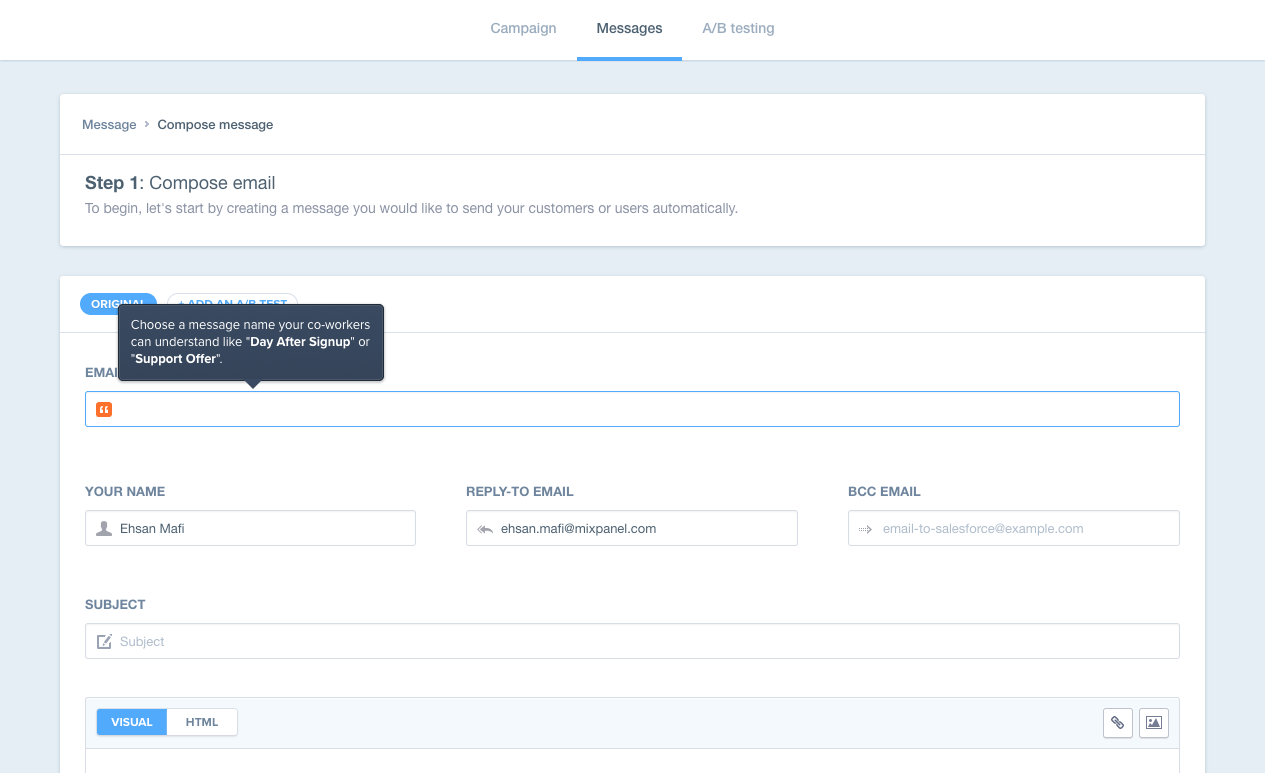
This interface should be largely self-explanatory, but it's important to note that you can use profile properties in all of the email fields.
Using profile properties in emails
Our templates will replace content that is wrapped in {{}}. For example, if you add
a Location property to your user profiles, you can send messages like this:
Come and visit us at our {{ ${Location} }} office!
A user with a profile property Location: Asheville will get the following message:
If some of your profiles have a value but others don't, you can use a fallback value:
Come and visit us at our {{ ${Location} | fallback:"nearest" }} office!
Profiles without a Location property will receive this message:
Using conditional logic in emails
When a fallback value for a missing people property is not enough, you can also use conditional blocks to change the contents of your message. We treat the tags
{% and %} as conditional logic, meaning you can use these tags to create a conditional email message.
There are three tags which will always appear in a conditional block in the same order:
- The if tag (explained below)
- The else tag (which is always written
{% else %}) - The endif tag (which is always written
{% endif %})
The {% if ... %} tag is the most important as this determines the conditional logic. It consists of:
- An opening
{%and the word if - A property name, surrounded by
${and}(just like in a variable) - A closing
%}
If the property name after the "if" is defined for a particular profile (meaning it isn't a boolean false value, an empty string, or a zero), then the text between the if block and {% else %} will appear in the email sent to that profile. Otherwise, the part between the {% else %} and the {% endif %} is included.
In our Location case, we might use a conditional block like this:
{% if ${Location} %}
   Come and visit us at our {{ ${Location} }} office.
{% else %}
   You haven't told us your location. Please update your location in your account, and we'll send you to our nearest office.
{% endif %}
A user with a profile property Location: Asheville will get the following message:
On the other hand, profiles without a Location property will receive this message:
Targeting users
When you submit the form, it will ask you to define the targeting criteria for your message. We're keeping it simple here and restricting the message to a single user named "Joe Doe". You can use many combinations of profile properties when you're creating a real message.

Scheduling your emails
Once you've targeted your users, you just have to schedule the email. There are two options for scheduling emails:
- ASAP messages: These messages go out to individual users as soon as they match the targeting criteria. It's common for users to go from "not matching" to "matching" - many messages include a time-based requirement such as "last login was greater than two weeks ago", or one based off of other profile properties that may change.
- Scheduled messages: These messages can be set to go out at a specified time, day of week, and interval. For example, you could set your message to go out at 9am PST every Wednesday. When the message runs, it finds all the users who match the criteria you have defined and sends it to them.